
How to Integrate Generative AI APIs in Web Apps

If I add generative AI to a web app, I keep the AI call on the backend, not in the browser. That one choice helps me protect API keys, check inputs, control spend, and keep an audit trail. It also gives me one place to handle privacy, rate limits, retries, and output review before anything reaches users.
Here’s the short version of the full setup:
- Frontend talks to my backend
- My backend talks to the AI provider
- Keys stay in
.envfor local use and in a secrets manager in production - Every request is validated before it reaches the model
- I track tokens, latency, errors, and spend
- I label output as AI-generated draft and route it through human review
- I format content for Canada, including en-CA, CAD, metric units, and dates like 2026-08-24 or 24 August 2026
A simple flow looks like this:
- User submits a prompt
- Backend checks the payload
- Backend adds the system instruction
- Backend calls the model
- App returns structured JSON
- UI shows the draft with review status and disclaimer
A few numbers help set guardrails early:
- A common starting point is temperature: 0.2
- Short replies often fit within 256 output tokens
- A sample backend rate limit is 10 requests per minute per user
- Spend alerts can trigger at 80% of monthly budget
- For interactive features, many teams aim for p99 under 2–3 seconds
The main point is simple: I treat AI as a drafting tool, not a final decision-maker. That means secure backend access, tight validation, clear UI labels, cost tracking, and a review step before use.
From there, the job becomes much simpler: connect the endpoint, show the output clearly, and monitor quality, latency, and cost over time.
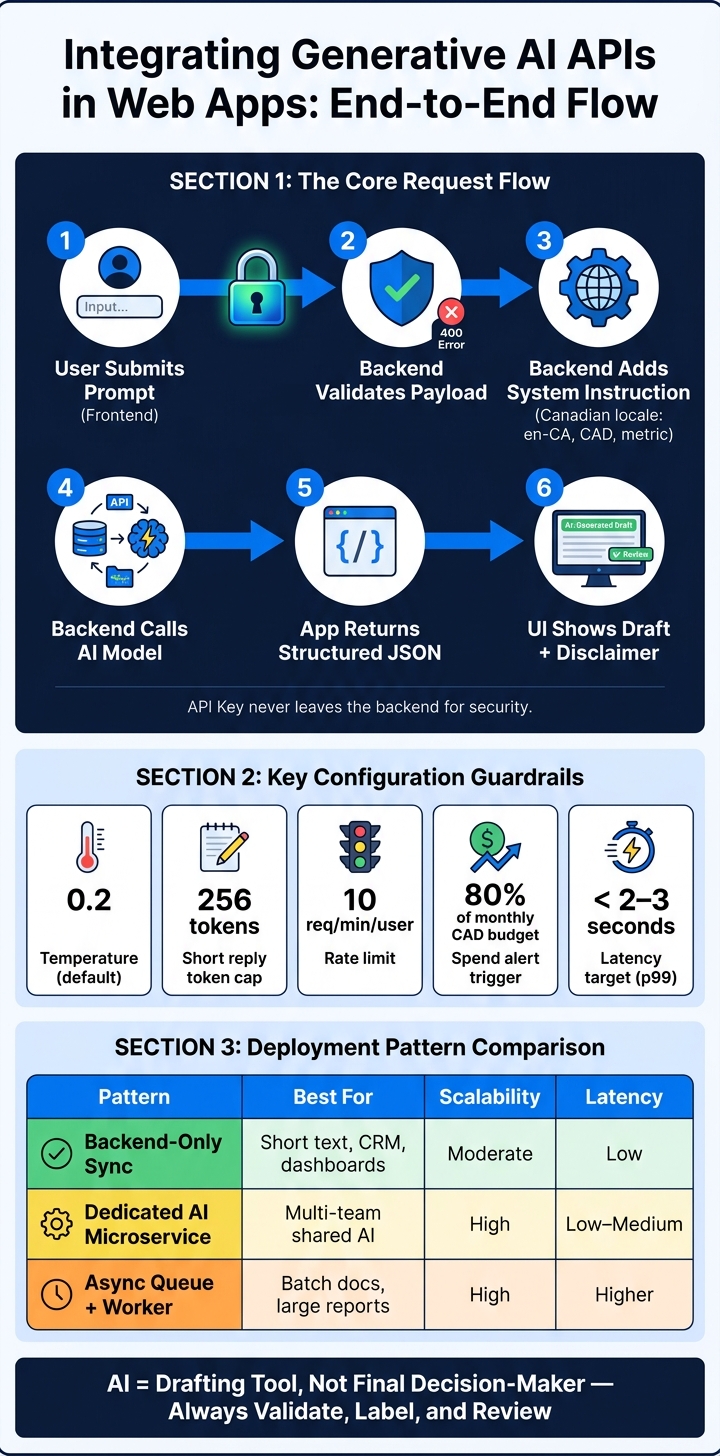
How to Integrate Generative AI APIs in Web Apps: End-to-End Flow
Set Up the Environment and Secure API Access
Set up the backend project and install dependencies
Since the request path already stays on the server, start with a clean backend setup. Use Node.js LTS (v18+) with npm, then install the core packages you need.
Run npm init -y, then install:
npm install express dotenv npm install --save-dev eslint prettier Add your provider’s SDK too. If there isn’t one, use axios. Also, commit package-lock.json so every environment – dev, staging, and production – uses the same dependency tree. That saves a lot of “works on my machine” pain later.
As the integration grows, keep the AI parts separate from server startup. A simple layout like this works well:
src/ server.js ← Express app entry point routes/ai.js ← AI routes config/env.js ← Environment variable loader middleware/ ← Auth, logging, rate limiting Your first server.js doesn’t need much. A health-check route and a stub /api/generate endpoint are enough to give you something you can test before model calls are connected:
import express from 'express'; import dotenv from 'dotenv'; dotenv.config(); const app = express(); app.use(express.json()); app.get('/health', (req, res) => res.json({ status: 'ok' })); app.post('/api/generate', (req, res) => { res.status(501).json({ message: 'Not implemented yet' }); }); app.listen(process.env.PORT || 3000); Add a .gitignore right away. It should exclude:
node_modules.env- log files
Store API keys safely and plan for compliance
Once the backend is in place, secure your secrets before you wire up any API calls. Use .env for local development only, and never commit it. A typical .env file for a Canadian web app might look like this:
AI_API_KEY=your-key-here AI_API_BASE_URL=https://api.openai.com/v1 DEFAULT_LOCALE=en-CA DEFAULT_CURRENCY=CAD Set DEFAULT_LOCALE=en-CA so dates, numbers, and currency are formatted the same way across the app. It also helps to keep that formatting logic in one localisation module instead of scattering it across routes and views.
For production, store secrets in a cloud secrets manager such as AWS Secrets Manager, Azure Key Vault, or GCP Secret Manager. These tools include encryption, access controls, and audit logs out of the box. Keep production secrets limited to operations or DevOps roles. Developers should use sandbox keys in non-production environments only.
It also helps to think ahead a bit. Set a rotation schedule for secrets and make sure keys can be replaced without downtime. Watch usage for odd spikes, and log token counts plus cost in CAD so monthly AI spend stays tied to budget.
If you’re working in a regulated Canadian setting, be clear about what data goes to the provider. Check whether that data is used for training, and strip out personal information before requests leave your backend. Log metadata only:
- timestamps
- pseudonymous user IDs
- model name
- token count
- latency
For public-sector deployments, complete privacy and threat reviews before go-live.
With dependencies installed and secrets locked down, the next step is building the generation endpoint and the prompt flow.
sbb-itb-fd1fcab
Build the Backend Integration and API Call Flow
Create a POST generation endpoint with input validation and prompt handling
With your environment ready and secrets locked down, the next step is the generation endpoint. A clean POST /api/generate route usually follows four steps: validate the request, build the prompt, call the provider, and return structured JSON. Once that route shape is in place, tighten the input before you connect the model.
Your request body can look like this:
{ "prompt": "string", "locale": "en-CA" } Read the user ID from the authenticated session or token on the backend – never take it from the client payload. Before anything reaches the model, validate the input. Require prompt, cap input at 1,500 characters, and reject malformed payloads with a clear 400 error. Libraries like Zod or Joi make this clean in Node.js. That keeps abuse in check and makes token costs easier to predict.
Send only user intent from the frontend. The backend should add the system message after validation, right before the API call. For a Canadian web app, that system message might be: You are an assistant generating content for Canadian users. Use Canadian spelling conventions and a locale-aware tone. Keep these templates in version-controlled config files so you can update them without changing route logic.
The response from your endpoint should use a fixed JSON shape, like this:
{ "id": "string", "output": { "text": "string", "tokensUsed": 412, "model": "string" }, "meta": { "latencyMs": 840, "timestamp": "YYYY-MM-DDTHH:mm:ssZ", "requestId": "string" } } Those fields are for downstream monitoring. Use them for alerts and budget tracking instead of repeating logging rules inside the route.
Choose model settings and control output quality
After validation and prompt assembly, tune the model for consistency and cost. Three settings matter most: temperature, max tokens, and top_p.
Temperature controls how predictable the output is. A value of 0.0–0.3 gives you consistent, near-deterministic responses. That fits internal tools, compliance content, or customer service replies. Higher values produce more varied text, which is better for marketing copy or brainstorming. Temperature 0 is the closest thing to deterministic, but small variation can still happen.
Max tokens is the clearest cost lever you have. Roughly 100 tokens equals 60–80 words, so a cap of 256 tokens works well for short answers, while 512–1,024 gives more room for detailed explanations.
A good default for many business cases is simple:
- Low temperature for steady output
- Low
maxOutputTokensto limit cost - Higher
top_ponly when you want more variation
For most business use cases, temperature: 0.2, maxOutputTokens: 256 is a sensible starting point.
Handle errors, rate limits, streaming, and cost control
Once generation works, protect the endpoint from retries, quotas, and timeouts. This is where many integrations fall apart in production.
For client errors (4xx), return a client error and do not retry. For transient failures (5xx or network timeouts), use exponential backoff with jitter – for example, 200 ms, 400 ms, 800 ms. On a 429, honour the Retry-After header first, then add a small random delay.
Add backend rate limits too. For example, allow 10 requests per minute per user with Redis or a similar store. That stops one account from burning through shared quota. If a user hits the limit, return a 429 with a clear message and a reset time.
For long outputs, add streaming. For short outputs, plain request-response is usually enough. If you add streaming with server-sent events (SSE), wrap it in a shared utility so the same endpoint can support both modes. Feature flags help you roll it out in stages instead of flipping the switch for everyone at once.
Once output quality settles down, the next job is keeping requests reliable and affordable. Tag every request with a feature name and model identifier, then track tokensUsed and latencyMs on every response. Use those returned fields for alerts and budget tracking. From there, forecast monthly spend from average daily usage, provider pricing, and a CAD buffer. Set an alert when monthly spend gets close to 80% of your allocated CAD budget. That matters in regulated, budget-sensitive deployments.
Next, connect this endpoint to the frontend and render the response safely.
Connect the Frontend and Design the User Experience
Send requests from the web app and display results clearly
With the backend endpoint in place, the frontend has a simple job: collect the user’s input, send it to POST /api/generate, and show the result in a clean way. Use fetch or Axios to send { prompt, context }. User identity should come from the authenticated session on the server. Stick to the same validation rules and response fields used by the endpoint so the UI stays thin and easy to maintain.
As soon as the user hits submit, disable the form and show a plain status message near the button, such as Generating draft content…. For an AI app, a spinner-only screen is weak UX. People need to know what’s happening.
If streaming is turned on, append each chunk to the output area as it arrives. While that happens, lock or dim the input form and show a visible Stop button so users can cancel early and keep the partial result. That’s a small touch, but it makes the app feel far more usable.
Keep the response schema modular so the frontend can render each piece on its own, or use a custom app feature planner to map out these requirements early. A clean public envelope looks like this:
{ "id": "gen-2026-08-24-00123", "status": "success", "content": { "text": "...", "language": "en-CA" }, "review": { "requiresHumanReview": true, "riskTags": ["policy", "legal"], "disclaimer": "This content is AI-generated and must be reviewed for accuracy." } } Render content.text as the main output. Show the disclaimer in a labelled banner so it doesn’t get missed. Keep token counts, cost, and latency out of the public UI; send those to logs or an admin-only dashboard instead.
The requiresHumanReview flag should drive your approval flow. Clear status badges help a lot here:
- AI draft
- In review
- Approved
- Published
That way, anyone looking at the interface can tell where a piece of content stands. Keep request and response IDs in the audit trail, and make those IDs easy to access from the UI.
Every AI output area should also be labelled clearly as AI-generated draft, with a tooltip that explains the content may contain errors or biases and should be reviewed before use.
Format generated content for Canadian users
Once the result appears properly, format it for Canadian users before display. Add a hidden system instruction on the backend before the API call that tells the model to use Canadian English spelling, metric units, temperatures in °C, and amounts in Canadian dollars (CAD).
Dates should appear as YYYY-MM-DD (ISO 8601) or 24 August 2026. Times should include the local time zone, such as 15:30 EDT. Currency should appear as $1,234.56 CAD on first use, with a period for decimals and a comma for thousands. If the model returns bare numbers, parse them and show them in a formatted summary field instead of leaving them buried in raw AI text.
For bilingual needs, give users direct English / French toggles and show each version in separate tabs or side-by-side panels labelled EN and FR. If someone writes a prompt in one language but needs both, the backend can add an instruction to generate both an English (Canada) and a French (Canada) version.
Review should happen by language, with each version approved on its own. That supports federal bilingual service requirements. Professional review of the French output remains essential before publication. You can also use a workflow automation benefits calculator to estimate the time saved by automating these multilingual drafts. Those UI states and review flags should also feed into your production monitoring later.
Deploy, Monitor, and Maintain the Integration
Pick a production pattern that fits the workload
Once the app is live, your deployment setup should match three things: how long requests take, how much traffic you get, and how risky retries are.
| Pattern | Best For | Complexity | Scalability | Latency |
|---|---|---|---|---|
| Backend-only synchronous integration | Short text generation in a CRM or internal dashboard | Low | Moderate | Low |
| Dedicated AI microservice | Shared AI used across multiple tools or teams | Medium | High | Low to medium |
| Async queue + worker | Long-running or heavy workloads such as batch document analysis or large report generation | Higher | High | Higher latency |
A simple rule works well here: start with the lightest setup that can hit your latency target. Then add a queue only when sync calls start slowing things down.
For most web application development projects, backend-only synchronous integration is the right first step. It keeps the stack simpler and is usually enough for short requests. But if users are stuck waiting too long, it’s time to shift. In that case, move long jobs to an async flow: return an HTTP 202 Accepted with a job ID right away, process the LLM call in a worker, and let the user know when the result is ready.
Also, use idempotency keys on job submission endpoints. That small detail can save you a lot of pain by stopping duplicate work during retries.
Latency targets should reflect the user experience you’re aiming for. For real-time features like autocomplete or interactive Q&A, aim for p99 response times below 2–3 seconds. For slower tasks like compliance checks or contract analysis, 5–30 seconds is usually fine.
Monitor behaviour, cost, and output quality continuously
Once the integration is in production, keep a close eye on behaviour, cost, and output quality. If you don’t watch those three, issues can pile up fast.
For each AI call, log:
- request ID
- model version
- token counts for prompt and completion
- latency
- any errors
Make daily spend visible in an admin dashboard, and set alerts before costs drift too far. Good alert triggers include error-rate spikes, latency above target, and daily token spend getting close to budget.
Use semantic caching to avoid repeating the same request and paying for it again. If the same prompt keeps showing up, there’s no reason to hit the model every time.
Performance metrics only tell part of the story, though. You also need regular quality reviews. Sample real prompts and outputs. Look for hallucinations, off-brand tone, and policy issues. Then tune your prompt templates based on what you find.
For Canadian public-sector or regulated deployments, keep a test suite of scenarios that must pass every time. That suite should cover inclusive language standards, Canadian spelling, and policy framing. Run it whenever you change a model or update a prompt.
It also helps to track business KPIs before and after launch. Measure things like time saved and support deflection so you can see whether the feature is helping in practice, not just working on paper.
How Generative AI Uses APIs: A Developer’s Mental Model | Ryan Day
FAQs
Why should AI API calls stay on the backend?
AI API calls should stay on the backend. That keeps API keys and tokens out of client-side code, where they can be exposed.
It also gives you tighter security controls, like encryption, strict access rules, and audit trails for compliance, including PIPEDA. On top of that, the backend puts request validation, rate limiting, and error handling in one place. It also helps keep sensitive user data out of the browser.
When should I use streaming instead of standard responses?
Use streaming when low perceived latency matters most to the user experience. Instead of making people wait for the full reply, streaming sends the output in chunks as the model writes it. That means users can start reading, reacting, or clicking right away.
This works especially well in interactive web apps, like real-time AI assistants and chat interfaces. In those cases, keeping response times under 1,000 milliseconds helps the experience feel smooth and responsive.
How do I keep AI output safe and reviewable?
Use a layered governance and monitoring approach. For high-impact systems, keep human-in-the-loop oversight so decisions aren’t fully automated. Also keep audit logs and version control so you have a clear, traceable record of updates and outputs.
Review outputs on a regular basis for fairness and accuracy. Document how decisions are made, and follow Canadian compliance requirements such as PIPEDA. For sensitive uses, set clear escalation paths to human agents and manually review flagged edge cases.