How AI Detects Construction Defects

I use AI to flag possible construction defects – not to confirm them. It checks site photos, video, scans, and notes for issues such as cracks or measurements outside project tolerances. Before you approve repairs, a qualified reviewer must check the finding against project requirements.
I organise the process into 4 steps:
- Prepare the data: Label site records, define defect types, and set tolerance limits.
- Analyse the files: Check image quality and location, then link suspected defects to notes and requirements.
- Review the findings: Use confidence and risk to guide checks. Escalate safety compliance issues, approve confirmed deficiencies, and verify repairs.
- Test and connect the workflow: Run a pilot before rollout, set access and privacy rules, and link each decision to its source records.
My rule is simple: <u>AI flags; qualified people decide.</u> A confidence score is not proof of safety or code compliance. I review false alarms and missed defects monthly to check whether the process needs changes.
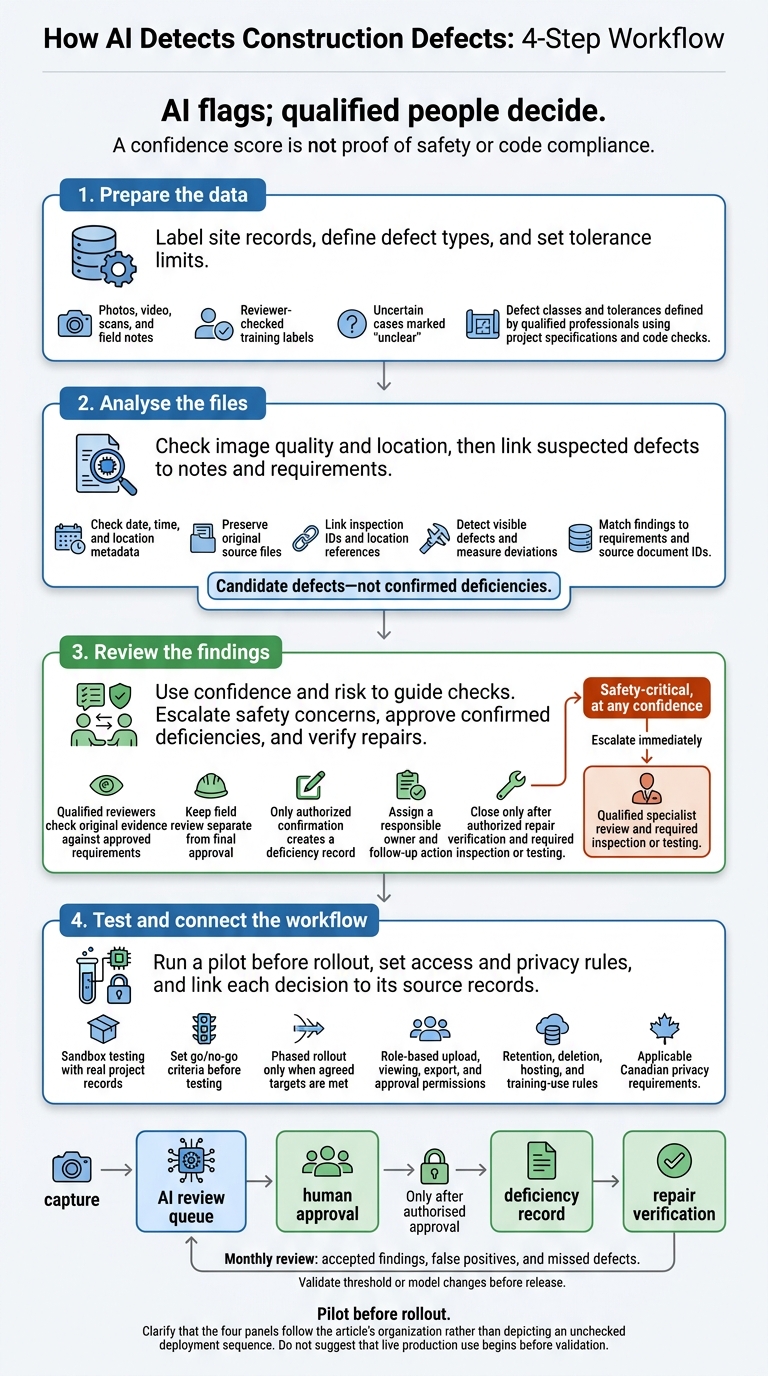
How AI Detects Construction Defects: 4-Step Workflow
Detección de fallas en la construcción utilizando fotogramas e inteligencia artificial
sbb-itb-fd1fcab
Step 1: Prepare Training Data and Defect Classes
Once the review workflow is set, build the labelled dataset the model will learn from.
Label Site Data for Training
Collect photos, video, scans, and field notes showing normal site conditions and suspected defects. These examples teach the model the difference between defects and normal variation. Link each image, video, or scan to its inspection record, written description, or incident report.
Use OCR and vision tools to turn job-site forms, safety reports, inspections, and field notes into structured training data. These tools can also extract information from scanned reports and PDF scans. Have reviewers check the extracted labels before using them for training.
Mark uncertain cases as unclear. Don’t force a defect label.
Define Defect Classes and Tolerances
Have qualified construction and quality professionals define defect classes and acceptable tolerance limits using project specifications and code checks.
A visual irregularity doesn’t automatically mean there’s a deficiency.
Choose an Image Analysis Method
Run an AI readiness audit to decide whether to adapt a pretrained model or build a custom system. Review your existing processes, data, tools, and risks before committing to a workflow.
Validate the model against project evidence. If project materials, image or scan conditions, or requirements cause recurring errors, adjust the workflow with project-specific customisation.
Use that choice to define the analysis workflow in the next step.
Step 2: Analyse Photos, Video, Scans, and Field Notes
Check File Quality and Site Location
This step turns raw site media into candidate defects – not confirmed deficiencies. Before analysis, check file quality and the date, time, and location metadata so the model uses traceable inputs.
Link each file to its source record, inspection ID, and location reference. Keep the original source files, and check location metadata against the site location reference. Clean, traceable inputs speed up defect detection and make results easier to verify.
Find Visible Defects and Measure Deviations
Computer vision can scan photos and video for visible defects and measurable deviations. It flags what it can see, but a reviewer must confirm the cause and importance of each issue.
Compare scan measurements with project records and tolerances, then match the flagged findings to the written record.
Link Findings to Notes and Requirements
Extract information from inspections, safety reports, handwritten notes, contracts, PDFs, and specifications into structured data. Match each finding to the relevant requirement so reviewers can compare it directly with the visual finding. Record the source record and document ID so reviewers can verify each match.
In the next step, reviewers use these outputs for confirmation and escalation, applying confidence thresholds and confirming which findings become deficiencies.
Step 3: Review and Confirm AI Findings
Set Confidence Thresholds and Escalation Rules
Once AI flags and organises findings, reviewers sort them by confidence and risk. Set confidence bands using validation results for each defect class and site condition. Keep field review separate from final approval, limit who can approve higher-risk findings, and maintain an audit trail of suggestions, reminders, and approvals.
| Confidence band | System action | Review requirement | Record status |
|---|---|---|---|
| High confidence | Suggest for human confirmation | Field reviewer checks evidence and requirements | Unconfirmed until human sign-off |
| Medium confidence | Request additional evidence | Qualified reviewer checks additional evidence | Pending further evidence |
| Low confidence | Log for audit review | Supervisor review | Not recorded unless safety-critical |
| Safety-critical, at any confidence | Escalate immediately | Safety lead or authorized administrator coordinates qualified specialist review and required inspection or testing | High-priority investigation |
Use these thresholds to decide which findings move into formal deficiency review.
Confirm Defects Before Recording Deficiencies
Check the original evidence against approved requirements and supporting documents. A photo or high confidence score does not prove that concealed work complies. Only authorized confirmation creates a deficiency record, which must include a responsible owner and the required follow-up action.
Verify Repairs and Track Detection Results
Close a deficiency only when an authorized reviewer has checked the repair evidence and any required inspection or test results. Keep original files, reviewer decisions, and timestamps according to the applicable retention rules.
Track accepted findings, false positives, and missed defects through sampled reviews and monthly review sessions. Validate any threshold or model changes before release. Use the results to adjust future thresholds and reduce repeat misses.
Step 4: Pilot and Connect the Workflow
Plan the Pilot, Budget, and Data Controls
Once confidence thresholds are set, test the workflow in a sandbox using real project records. Then roll it out in phases based on data readiness and validation. Use real site media to test defect classes, confidence thresholds, and reviewer approvals.
Set go/no-go criteria before testing. Use benchmarks to check whether the workflow reduces manual review, routes findings, and triggers approved actions. Compare results with the current process, and expand only when agreed targets are met.
Set role-based permissions for uploading, viewing, exporting, and approving. Before collecting identifiable worker images or notes, establish rules for retention, deletion, hosting, and training use. Check applicable Canadian privacy requirements, too.
Connect Review and Deficiency Systems
Once the pilot is stable, connect mobile site capture, AI review, and deficiency tracking in one traceable flow: capture → AI review queue → human approval → deficiency record → repair verification. Create a formal deficiency record only after authorised approval, and log each handoff between the capture, review, and deficiency systems.
Treat construction-defect detection as a custom workflow. Before building it, define the defect classes, approval permissions, integration scope, and validation criteria.
Conclusion: Keep Defect Decisions Accountable
Before deployment, use reliable site evidence, clearly defined defect classes, and sandbox validation. Confidence scores guide review; qualified reviewers approve findings. Keep the audit trail complete by linking source evidence, reviewer approval, and repair sign-off.
Review detection and repair outcomes monthly. Use those results to adjust the model and reviewer rules so defect decisions stay accountable in day-to-day use.
FAQs
How much labelled data do we need to train the AI?
You don’t always need the massive, fully annotated datasets that older machine learning models required. Modern methods, such as semi-supervised learning, let teams fine-tune models using smaller datasets or partly labelled images. That means less manual data preparation.
Digital Fractal Technologies Inc specializes in these efficient machine vision methods, helping Canadian businesses start projects with smaller datasets instead of building fully annotated image libraries from the start.
How do we test whether AI is missing defects?
Before going live, run a silent pilot with alerts turned off. Use it to tune the models and set an accuracy baseline. Track error rates, throughput, and processing time to check reliability. Then monitor continuously for model drift – a decline in performance over time.
Digital Fractal Technologies Inc supports this process through AI audits, custom workflow assessments, and regular monitoring to help keep systems accurate and effective.
When should an AI finding trigger on-site testing?
AI findings should prompt on-site testing when they flag high-risk hazards or unusual conditions that need immediate checks for safety and compliance. Life-safety risks, exclusion-zone breaches, and possible equipment failures require physical inspection to confirm the findings before corrective action.
Adding these alerts to existing project management platforms helps supervisors record findings as formal observations and make testing part of the established workflow.