
Ultimate Guide to Native Mobile App Development
Native mobile app development focuses on building apps tailored to specific platforms like iOS and Android, ensuring top performance, full hardware access, and platform-specific user experiences. For Canadian businesses, this approach is ideal for industries requiring strong data security, bilingual support, and accessibility compliance. Here’s what you need to know:
- Tools & Languages: Use Swift and Xcode for iOS; Kotlin and Android Studio for Android.
- Performance: Native apps outperform cross-platform and web apps in speed, hardware access, and battery efficiency.
- Cost & Timelines: MVPs range from CAD $15,000–$60,000 over 2–4 months, while enterprise apps exceed CAD $120,000 with timelines up to 18 months.
- Regulations: Ensure compliance with Canadian laws like PIPEDA, PHIPA, and AODA.
- Planning: Define clear goals, prioritize features, and consider bilingual support from the start.
- Maintenance: Annual updates cost 15–25% of the initial budget, with continuous monitoring needed for performance and compliance.
Native apps are ideal for businesses prioritizing performance, security, and user trust. The guide covers planning, architecture, tools, and long-term maintenance to help you succeed.
Planning Your Native App Development Project
Native Mobile App Development Costs & Timelines in Canada
When diving into native app development, the planning phase is where you set the stage for success. Careful preparation not only ensures smoother execution but also minimizes rework, saving both time and money – potentially cutting costs and timelines by two to three times.
Setting Business Goals and Success Metrics
Before writing a single line of code, you need to define clear and measurable goals. Vague aspirations like "improve customer experience" won’t cut it. Instead, focus on specific outcomes tied to performance metrics.
"A strategy defines what success looks like before you build anything. It establishes KPIs such as DAU/MAU ratios, retention rates, conversion metrics, and revenue targets." – Rakesh Patel, Space-O Technologies
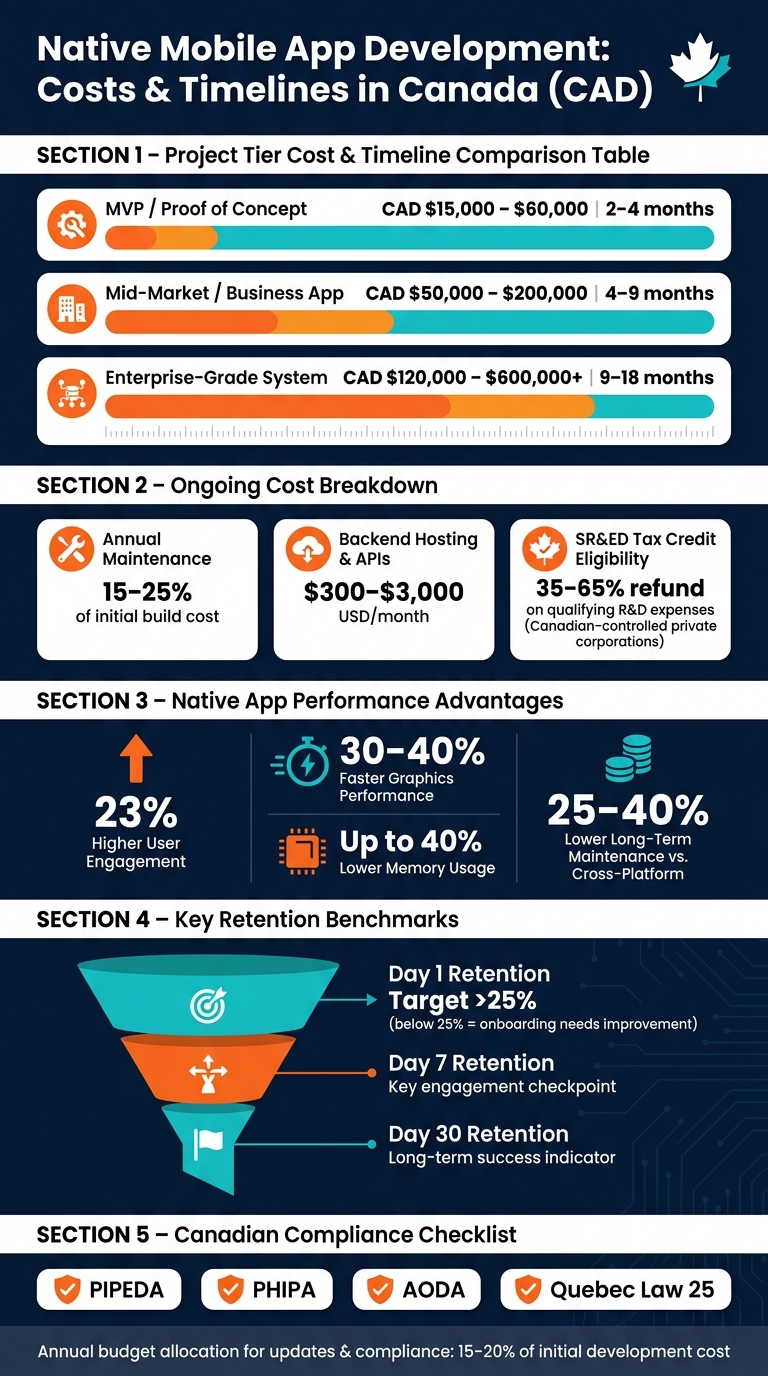
Retention rates – particularly on Day 1, Day 7, and Day 30 – are some of the most reliable indicators of long-term success. For instance, if your Day 1 retention is under 25%, it’s a sign your onboarding process needs improvement before you pour resources into acquiring new users.
To manage your project scope effectively, consider using the MoSCoW framework or a custom app feature prioritization tool to categorize features into Must, Should, Could, and Won’t. This helps prevent scope creep and keeps your focus on launching with 3–5 core features. These features let you test market demand before committing to a full-scale build.
Once your goals are in place, the next step is selecting the platforms and devices that align with your audience.
Choosing Target Platforms and Devices for the Canadian Market
Your choice of platform – iOS, Android, or both – should depend entirely on your audience. In Canada, the smartphone market is relatively balanced between these two platforms, but demographics and industry trends can influence your decision. For example, enterprise and healthcare sectors often prefer iOS, while consumer-facing apps may require a presence on both platforms.
Bilingual support is essential for national reach. An English-only app automatically limits access to Quebec, where French is the primary language. This isn’t just an accessibility feature; it’s a critical market decision. Bilingual support affects everything from UI design to content management and testing timelines, so it must be accounted for at the start.
Privacy compliance is another non-negotiable. Canadian apps must adhere to regulations like PIPEDA, PHIPA, and Quebec’s Law 25. Planning for compliance from the outset is much cheaper than retrofitting later, which can double costs. To avoid issues, map out your data flows before finalizing your app’s architecture.
Budgeting and Timelines in Canadian Dollars
Development costs in Canada vary widely depending on the complexity of your project. Here’s a realistic breakdown:
| Project Tier | Estimated Cost (CAD) | Estimated Timeline |
|---|---|---|
| MVP / Proof of Concept | $15,000 – $60,000 | 2 – 4 months |
| Mid-Market / Business App | $50,000 – $200,000 | 4 – 9 months |
| Enterprise-Grade System | $120,000 – $600,000+ | 9 – 18 months |
Don’t overlook additional costs like backend hosting and third-party APIs, which can range from $300 to $3,000 USD per month depending on your app’s scale. Also, factor in time for Apple’s App Store review process, which typically requires at least two weeks.
Annual maintenance costs, including updates and patches, will account for 15–25% of the initial build cost. If you’re a Canadian-controlled private corporation, you might also be eligible for the SR&ED tax credit, which can refund 35–65% of qualifying R&D expenses.
"The number every vendor quotes you is the build cost – the number that actually matters is the three-year total cost." – Byteager Solutions Corp.
Focusing on the three-year total cost gives you a more realistic picture of your investment. This approach lays the groundwork for designing your app’s architecture and planning efficient development workflows.
sbb-itb-fd1fcab
Designing and Architecting Native Mobile Apps
Once your budget and timeline are set during the planning phase, the next big step is to design a solid app architecture and stellar UI/UX design. This is a foundational decision that can shape your app’s performance, scalability, and long-term success. Let’s break down how to structure your app, handle data effectively, and ensure your codebase can grow seamlessly.
"Architecture is not a technical afterthought. It is a strategic business decision." – AppStudio
Platform-Specific Architecture Principles
Both iOS and Android have embraced MVVM (Model-View-ViewModel) as their go-to architecture pattern. For iOS, this means combining SwiftUI with @Observable. On Android, it involves using Jetpack Compose with StateFlow. In both cases, ViewModels act as the central hub for managing UI state, while Views are reactive and short-lived. This approach ensures that Activities, Fragments, and SwiftUI Views can be recreated without losing data, as the state is safely stored in the ViewModel.
For more complex scenarios – such as real-time booking flows or multi-step payment processes – MVI (Model-View-Intent) can be a better choice. It relies on a single immutable state object and enforces unidirectional data flow, which makes debugging much easier. However, for simpler screens, MVVM is usually more straightforward and sufficient.
At a deeper level, Clean Architecture is a great way to organize your code. This structure divides the app into three layers: Presentation, Data, and (optionally) Domain. The Domain layer, written in pure Kotlin or Swift, avoids dependencies on external frameworks, making it easier to test and maintain.
Data Management and Offline Capabilities
For local data storage, use Room on Android and Core Data on iOS instead of directly relying on SQLite. These tools simplify database management and make your code cleaner.
Adopting an offline-first approach can make your app more reliable.
"The most resilient mobile apps treat the local database as the single source of truth and treat the network as a background sync mechanism." – Softaims
With this method, your app reads and writes to the local database first, syncing with the server in the background. This approach is particularly important in Canada, where rural and remote areas often experience inconsistent connectivity. By treating the network as secondary, you create a smoother user experience and build trust.
When managing state, it’s important to separate the different types:
- Local UI state: Temporary elements like a button’s loading animation.
- Session state: Contextual information, such as the logged-in user.
- Server state: Data fetched from remote servers.
Mixing these states can lead to stale or incorrect information, so keep them distinct to avoid unnecessary complications.
Scalability and Code Modularization
As your app grows, a modular codebase becomes essential. While a monolithic structure may work for small projects, it quickly becomes unwieldy as the app scales. The solution? Feature-based modularization. For example, create independent modules like :feature:auth or :feature:checkout. These modules should be loosely coupled, meaning they depend on each other as little as possible.
A modular approach not only speeds up development but also helps avoid costly rewrites. Without modularization, your team risks running into budget overruns and delays.
For Android developers, tools like Gradle Version Catalogs can centralize dependency management, while Convention Plugins help share build logic across modules. Use implementation instead of api for dependencies to avoid transitive leaks and improve build times. On both platforms, use strict visibility controls like Kotlin’s internal keyword or Swift’s internal access modifier. This limits what other modules can access, keeping your codebase clean and making onboarding new developers easier.
Native App Development Tools and Workflows
This section dives into the tools, workflows, and security protocols essential for smooth and effective native app development.
Setting Up Development Environments
For native app development, Xcode is the go-to for iOS, while Android Studio is the standard for Android. Xcode provides the iOS SDK, simulators, and tools for performance profiling. On the Android side, Android Studio offers features like the Android SDK Manager, an emulator, and Logcat debugging. Both tools are free and tightly integrated with their respective platforms.
While simulators are helpful, they come with limitations. Testing on real devices is crucial to identify hardware-specific issues like network performance, camera functionality, and GPS accuracy – things simulators often miss. This is particularly important for Android, as devices from manufacturers like Samsung, Pixel, and Xiaomi vary significantly in screen sizes and hardware. As a result, Android testing typically requires two to three times more QA resources than iOS.
When it comes to programming languages, the choices are straightforward. iOS development revolves around Swift 6.1, while Android relies on Kotlin 2.0. The new Kotlin 2.0 K2 compiler boasts compile times up to twice as fast as its predecessor, which can save developers a lot of time over long-term projects. Swift 6.1 also introduces strict concurrency features, allowing developers to catch data race conditions during compile time rather than runtime.
Once your environment is set, the next step is to establish strong coding standards and automate testing to ensure your codebase remains reliable.
Coding Standards and Automated Testing
"Native apps reduce framework-related bugs significantly because they work directly with stable platform APIs, not abstraction layers." – Oleksandr Padura, Founder & CEO, Kultrix
Maintaining consistent code quality is critical, especially for scaling teams. Tools like SwiftLint for iOS and Detekt for Android enforce linting rules and ensure code quality from the start. Setting up a CI/CD pipeline allows automated builds and tests to trigger with every commit, reducing the risk of errors creeping into the codebase.
For testing, iOS developers use XCTest for unit tests and XCUITest for UI automation. Android developers rely on JUnit for unit testing, Espresso for UI interactions, and UI Automator for system-level testing. Adopting agile sprints – typically two weeks long – with integrated QA ensures issues are caught early, avoiding expensive rewrites caused by late-discovered architectural problems.
To complement your workflow, robust security measures are a must.
Security Best Practices for Native Apps
Security should be considered from the very beginning of development, not as an afterthought. Following the OWASP Mobile Top 10 guidelines is a great starting point. For iOS, sensitive data should be stored using Keychain Services, and user authentication can be handled via LocalAuthentication (e.g., Face ID or Touch ID). On Android, use the Android Keystore for secure key storage and BiometricPrompt for biometric authentication.
Sensitive data should never be stored in plaintext. Instead, use Encrypted SharedPreferences for Android and Keychain for iOS. For apps that communicate with a backend, implementing certificate pinning protects against man-in-the-middle attacks. Additionally, Canadian apps handling sensitive information, such as health or financial data, must comply with federal regulations like PIPEDA and, where applicable, provincial standards such as PHIPA.
Deploying, Monitoring, and Maintaining Your Native App
Once your app is secure and ready, the focus shifts to deployment, performance tracking, and long-term upkeep.
Releasing Apps to the App Stores
Before submitting your app, make sure to disable logging, enable ProGuard for Android, and sign the app with a cryptographic key that’s valid until at least October 22, 2033. Keep in mind that since August 2021, Google Play mandates the use of Android App Bundles (AAB) instead of APKs, with a maximum compressed download size of 200 MB. For iOS apps, they must be built using the iOS 26 SDK or later starting April 28, 2026.
Both Google and Apple require privacy documentation before submission. Apple demands Privacy Nutrition Labels, while Google requires a Data Safety form. These forms outline what data your app collects and its purpose. Another critical requirement: both platforms insist that users must be able to delete their accounts directly within the app – redirecting them to an external site is not allowed.
Plan for a week of external testing using tools like TestFlight for iOS or Google Play closed testing for Android before submitting your app. If your app requires login credentials, include active test account details in the App Review notes. Missing this step is one of the most common reasons apps get rejected right away.
Once your app is live, the focus shifts to monitoring its performance to ensure it meets user expectations.
Monitoring Performance and Usage
After launch, consistent monitoring is key to maintaining user satisfaction. Google Play enforces strict thresholds for crashes and ANRs (Application Not Responding errors): a crash rate above 1.09% or an ANR rate over 0.47% can hurt your app’s visibility and lead to warning labels on your store listing. Top-performing apps aim for crash-free sessions above 99.95%, as anything below 99.7% often results in lower ratings.
Tools like Firebase Crashlytics provide real-time crash tracking, while App Store Connect Analytics lets you break down performance metrics by app version, device type, and region. From the start, aim for key performance benchmarks: cold start times under two seconds, a steady 60 FPS frame rate, and memory usage below 200 MB. Integrate crash reporting tools with platforms like Slack or Jira for instant alerts when issues arise – don’t wait for users to flag problems in reviews.
"Performance testing for mobile is not a phase – it’s a continuous discipline. Your app’s startup time, frame rate, and battery efficiency are features your users feel every single time they open it." – Yuri Kan, Senior QA Lead
Long-Term Maintenance and Updates
To ensure your app stays stable and relevant, adopt a continuous release strategy with the ability to roll back updates quickly if necessary. For Android apps, targeting API level 36 (Android 16) by August 31, 2026, is essential to remain visible to new users on Google Play. Additionally, apps using native C/C++ code must support 16KB memory page sizes for compatibility with Android 15+.
A two-week release cycle with phased rollouts is a smart approach. Start by releasing updates to 1% of users, then gradually expand to 5%, and finally 20%. Use feature flags to quickly disable problematic features if needed, minimizing user disruption while maintaining control.
"Mobile release engineering is more complex than web release due to store reviews and delayed rollbacks." – StackAuthority
The table below outlines how different release surfaces handle rollbacks:
| Release Surface | Rollback Time | Best Used For |
|---|---|---|
| Store Binary | 3–7 days (review required) | Major features, platform integrations |
| OTA Update | 5–60 minutes | Bug fixes, minor UI adjustments |
| Feature Flags | Under 5 minutes | Feature rollout, kill switches |
| Server-Driven | Under 5 minutes | Content, pricing, API behaviour |
Finally, don’t overlook the importance of responding to user reviews. On platforms like Apple’s App Store, developer responses are public. A thoughtful reply to a negative review can go a long way in building user trust and improving your app’s reputation over time.
Key Takeaways from This Native App Development Guide
Here’s a recap of the strategies and practices that can lead to successful native app development:
Achieving success in native app development hinges on three core elements: clear planning, strong architecture, and consistent maintenance. Neglecting any of these can lead to issues like scope creep, technical debt, or even app performance decline.
The benefits of native development are hard to ignore. It offers 23% higher user engagement, 30–40% faster graphics performance, and can reduce memory usage by up to 40%. Additionally, a well-designed native codebase can lower long-term maintenance costs by 25–40% compared to cross-platform and hybrid alternatives. Early decisions, such as using frameworks like SwiftUI or Jetpack Compose, planning for shared backend APIs, and integrating hardware-backed security, can make future updates smoother and more cost-effective. These choices not only safeguard your app’s functionality but also help with financial planning down the road.
"Native apps age better when the team plans for the second wave of features, not just the launch checklist." – Wonderment Apps
When it comes to costs, an MVP (Minimum Viable Product) typically ranges between CAD $50,000 and $150,000, whereas enterprise-level projects often surpass CAD $250,000. These numbers highlight the importance of strategic planning, scalability, and security. It’s also wise to allocate 15–20% of your initial development budget annually for updates, security patches, and compliance with regulations like PIPEDA and Quebec’s Law 25.
Finally, launching your app is just the starting line. Tracking retention rates – on Day 1, Day 7, and Day 30 – can reveal how effective your onboarding process is. Maintaining a steady release cycle, supported by CI/CD pipelines and phased rollouts, ensures your app stays stable and adapts to the ever-changing market.
FAQs
Do I need separate iOS and Android apps?
Whether you should develop separate iOS and Android apps depends largely on the requirements of your project. Native development involves building individual apps for each platform using their dedicated programming languages – Swift for iOS and Kotlin for Android. This approach guarantees peak performance and allows full use of each platform’s features. However, it also means managing two separate codebases, which can drive up costs. Digital Fractal Technologies Inc specializes in crafting platform-specific apps that are perfectly aligned with the unique capabilities of each operating system.
How do I plan bilingual (English/French) support properly?
When building bilingual support, start by adopting an internationalization-first approach. This means externalizing all user-facing text – like menus, labels, and notifications – into resource files such as JSON or XML. This makes it easier to manage translations and adapt content for multiple languages.
For Canadian contexts, use locale-aware APIs to format elements like dates (YYYY-MM-DD), currency (e.g., CAD $), and measurements correctly. Also, ensure your system supports UTF-8 encoding to handle French-specific characters seamlessly.
Design your user interface with flexibility in mind, as French text often requires more space than English. Test thoroughly for potential text overflow issues and adjust layouts accordingly. Finally, rely on professional Canadian French translators to ensure linguistic accuracy and compliance with local regulations, such as Quebec’s Bill 96. This step is crucial to meet legal standards and maintain credibility with your audience.
What’s the best way to keep user data compliant in Canada?
Taking a Privacy-by-Design approach means weaving security and accountability directly into your app’s architecture. This isn’t just a best practice – under PIPEDA (Personal Information Protection and Electronic Documents Act), you’re responsible for all personal information collected, even if it’s processed outside of Canada.
Here’s how to get started:
- Obtain meaningful consent: Make sure users clearly understand what data you’re collecting and why.
- Limit data collection: Only gather information that’s absolutely necessary for your app’s functionality.
- Strengthen encryption: Use robust encryption methods like AES-256 to protect sensitive data.
- Maintain audit trails: Keep detailed records of data access and processing activities.
If your app relies on third-party services, ensure they meet comparable security standards. This is especially crucial for cross-border data transfers or contracts requiring Canadian data residency. Taking these steps not only protects user privacy but also helps you stay compliant with Canadian regulations.