Optimistic Rollups Deployment: Key Steps | Digital Fractal
Want to scale Ethereum apps while cutting costs? Optimistic rollups might be the solution you’re looking for. These Layer 2 solutions process transactions off-chain, reducing gas fees and congestion on Ethereum’s main network. By compressing data and assuming transactions are valid unless challenged, rollups can handle up to 2,000 transactions per second and lower gas costs to as little as 0.001 Gwei – compared to Layer 1’s 40 Gwei.
Key points to know:
- How they work: Transactions are processed off-chain but posted back to Ethereum for security. Challenges to invalid transactions trigger fraud proofs.
- Who benefits: Apps with high transaction volumes, like DeFi, gaming, or supply chain platforms, see significant cost savings.
- Setup requirements: You’ll need tools like Git, Go, Node.js, and Docker, along with a strong grasp of Ethereum scaling, Solidity, and private key management.
- Deployment process: Includes configuring smart contracts, setting up infrastructure (e.g., sequencers, batchers, proposers), and testing cross-chain operations like deposits and withdrawals.
Why it matters: Rollups offer faster transactions, lower fees, and compatibility with Ethereum’s ecosystem, making them a practical choice for scaling dApps. This guide outlines every step – design, deployment, and monitoring – to help you implement rollups effectively.
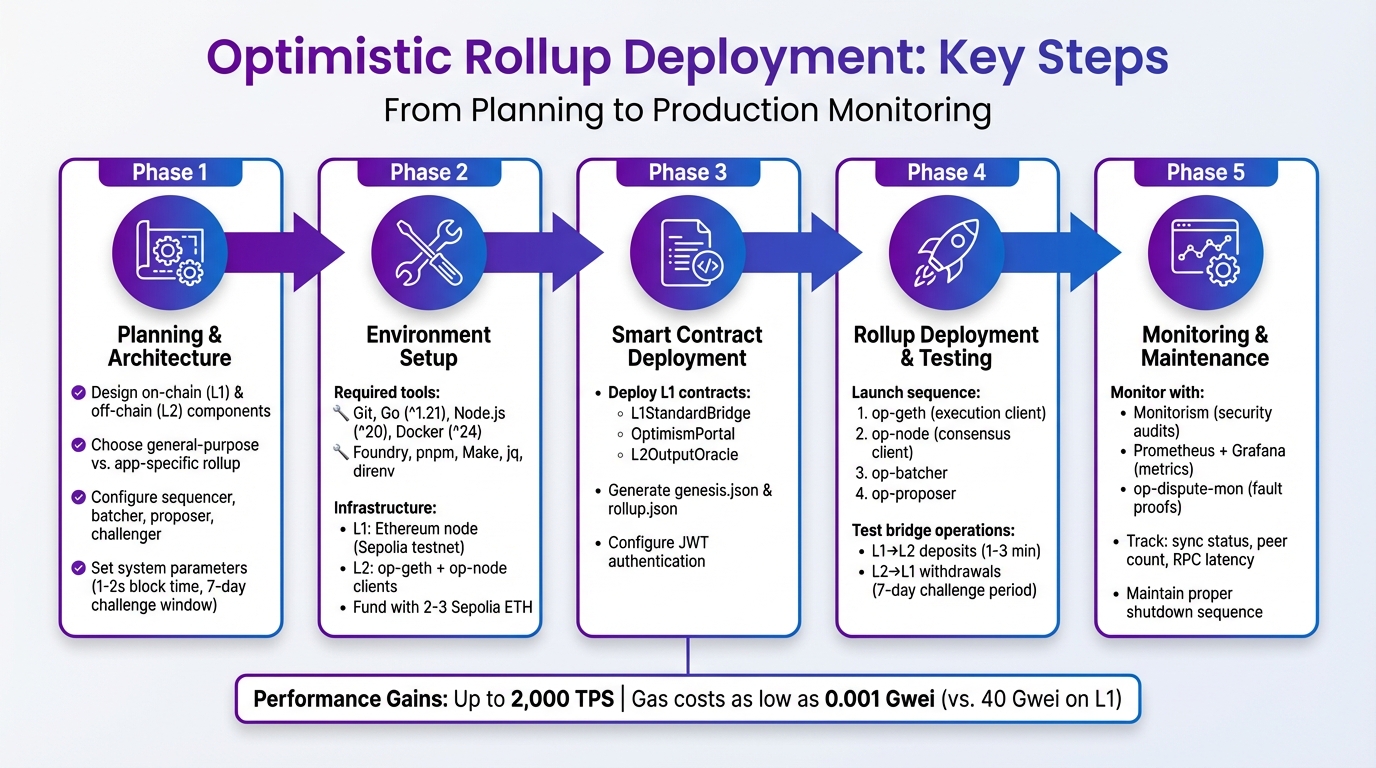
Optimistic Rollup Deployment Process: 5 Key Phases
Optimism 🛠️ Launch your own Rollup with the OP Stack in 30 minutes – Kelvin Fichter
Planning the Optimistic Rollup Architecture
Start by laying out the key components and how they interact. An optimistic rollup relies on two main layers: on-chain smart contracts on Ethereum Layer 1 and an off-chain virtual machine on Layer 2. The Layer 1 contracts handle tasks like managing the bridge, storing rollup blocks, and resolving fraud disputes. Meanwhile, Layer 2 is where applications operate. Here’s how it works: the sequencer organizes user transactions into L2 blocks, the batcher bundles these blocks for Ethereum’s data availability layer, the proposer submits L2 state roots to L1 (used for withdrawals), and the challenger steps in with fraud proofs if necessary. Together, these components form the backbone of your rollup’s architecture, shaping its design, configuration, and security measures.
Key Design Decisions
One of the first decisions is whether to build a general-purpose rollup or one tailored to a specific application. For enterprise use cases – like fintech or public-sector systems – a private mempool on the sequencer can help mitigate MEV (Maximal Extractable Value) attacks by hiding transaction order. Another crucial choice involves data availability. You can stick with traditional calldata or explore using pruned EIP-4844 blobs for storage efficiency.
For production-grade deployments, consider specialized infrastructure nodes. Examples include:
- Tx Ingress Nodes for handling public transactions,
- Archive RPC Nodes for accessing historical data, and
- Full Snapsync Nodes for peer discovery.
To improve security and performance, tools like proxyd can help with RPC request routing, load balancing, and method whitelisting. These decisions will directly affect how your rollup performs, how much it costs, and how secure it is.
System Parameters and Security Considerations
Fine-tuning system parameters is critical to achieving the right balance between performance and security. For instance, a block time of 1–2 seconds provides good latency and throughput, while keeping the gas limit below 200,000,000 gas per block ensures efficiency. A 7-day challenge window is recommended to allow sufficient time for fraud detection. As Ethereum.org notes:
Optimistic rollups are considered ‘optimistic’ because they assume offchain transactions are valid and don’t publish proofs of validity for transaction batches posted onchain. – Ethereum.org
To prevent censorship, set the sequencer window to 3,600 L1 blocks (about 12 hours), limiting how long the sequencer can delay transactions on L1. Additionally, configure the maxSequencerDrift to 1,800 seconds, ensuring L2 timestamps align closely with L1. A minimum base fee of 100,000 wei can help stabilize transaction costs by reducing volatility in priority fee auctions.
For added security, assign roles like finalSystemOwner and proxyAdminOwner to multi-signature wallets or decentralized governance structures. This ensures your Layer 1 contracts are well-protected. Documenting these settings is essential to maintain clarity and align with stakeholder expectations.
Documenting Deployment Requirements
Once your system settings are defined, compile detailed documentation to guide stakeholders through the deployment process. For Canadian enterprises, this means outlining throughput, latency, and security benchmarks from the outset. For instance, if your application handles thousands of transactions daily, specify the target transactions per second and acceptable confirmation times. In public-sector implementations, explain the implications of the 7-day withdrawal delay since trustless withdrawals require the challenge period to conclude.
Your documentation should also include strategies to address censorship resistance. For example, detail how users can submit transactions directly to L1 if the sequencer is unresponsive or malicious. A disaster recovery plan is equally important – explain how Archive Nodes will help reconstruct historical data in case of failure. By addressing these factors, your documentation will provide a clear roadmap for balancing performance, cost, and security before moving forward with deployment.
Configuring the Development and Deployment Environment
To get started, you’ll need to set up both Layer 1 (L1) and Layer 2 (L2) infrastructure, prepare your development tools, and configure smart contracts. This ensures smooth communication between layers and reduces the chance of errors during setup.
Infrastructure Setup
For your infrastructure, you’ll need access to an Ethereum node on L1, typically using the Sepolia testnet for deployments. This can be achieved through RPC providers like Alchemy or Infura, or by running your own Sepolia node if you prefer complete control. On L2, you’ll deploy two key clients: the execution client (op-geth) to handle transactions and maintain state, and the consensus client (op-node), which derives the L2 chain from L1 data.
In addition to these, operational services play a crucial role:
- The batcher (
op-batcher) collects transactions from L2 and sends them to L1. - The proposer (
op-proposer) submits L2 state roots, enabling withdrawals. - The challenger (
op-challenger) monitors and disputes invalid state roots.
For testnet deployments, ensure you have 2–3 Sepolia ETH to cover the costs of contract deployment and initial sequencing. When setting up your rollup, follow this sequence: start with op-geth, then op-node, followed by op-batcher, and finally op-proposer.
Development Environment Preparation
To prepare your development environment, install the following dependencies:
- Git
- Go (^1.21)
- Node.js (^20)
- pnpm
- Foundry (^0.2.0)
- Make
- jq
- direnv
- Docker (^24)
Use Foundry’s cast to generate unique wallet addresses for each operational role. These tools will help you compile OP Stack binaries, run deployment scripts, and containerize rollup components.
A particularly useful tool is direnv, which automatically loads environment variables from .envrc files into your shell. This eliminates the need to manually export sensitive details like private keys and RPC URLs, reducing the risk of misconfigurations. To keep things organized, structure your workspace into subdirectories for each component (e.g., deployer, sequencer, batcher, proposer, challenger). This approach makes it easier to manage configurations and logs.
Once your tools are ready, the next step is configuring the smart contracts.
Smart Contract Configuration
Smart contracts are the backbone of L1 and L2 interactions, completing your rollup setup. Deploying your rollup requires several L1 smart contracts to handle bridging and rollup operations. Key contracts include L1StandardBridge, OptimismPortal, and L2OutputOracle (or dispute game contracts for fault proofs).
The op-deployer CLI tool simplifies the deployment of these contracts and generates two critical files:
genesis.jsonfor the execution client.rollup.jsonfor the consensus client.
During deployment, configure important parameters:
- Set
batchInboxAddressto receive transaction batches on L1. - Assign
l2OutputOracleProposeras the sole address allowed to submit L2 state roots. - Designate a
finalSystemOwner, ideally a multi-signature wallet, to manage L1 contracts.
Additionally, create a shared secret file (jwt.txt) to enable authenticated communication between op-geth and op-node. Before launching L2 services, test your L1 RPC connectivity to ensure everything is functioning as expected.
sbb-itb-fd1fcab
Deploying and Testing the Rollup
Step-by-Step Rollup Deployment
To get started, deploy your Layer 1 (L1) smart contracts using op-deployer. This tool creates two critical files: genesis.json for the execution client and rollup.json for the consensus client. Afterward, run op-validator to ensure the on-chain configuration is accurate.
The deployment process typically follows this sequence: first, initialize the execution client (op-geth), then launch the consensus client (op-node), followed by the batcher (op-batcher), and finally the proposer (op-proposer). To simplify the process, you can use Docker Compose commands like make init, make setup, and make up. For optimal performance, set the l2BlockTime to 1–2 seconds, ensuring it stays below the L1 block time. Once this setup is complete, move on to validating cross-chain bridge operations.
Cross-Chain Bridge Validation
Testing the bridge functionality is essential. This involves validating deposits (transfers from L1 to L2 using a lock-and-mint mechanism) and withdrawals (transfers from L2 to L1 via burn-and-unlock). Typically, deposits through the Standard Bridge take about 1–3 minutes, while withdrawals on production networks require a 7-day challenge period. On test environments, however, the finalization period can be as short as 12 seconds.
For deposit validation, confirm that assets locked in the L1StandardBridge successfully trigger a finalizeDeposit call on L2, resulting in token minting. You can use CLI tools like cast balance --rpc-url <URL> to check balances on both chains before and after transactions. For ERC-20 tokens, make sure the L2 token representation adheres to the IOptimismMintableERC20 interface.
DApp Deployment on the Rollup
When deploying decentralised applications (DApps) on the rollup, update your smart contract addresses to point to the L2 RPC. Adjust the front-end to reflect the new L2 chain ID and endpoint, then redeploy your contracts with minimal changes. Thanks to Ethereum Virtual Machine (EVM) compatibility, existing Solidity contracts can be redeployed with little modification. Use a testnet like Sepolia to test your contracts, ensuring both the bridge flows and the overall functionality of your DApp are working as intended.
Monitoring, Maintenance, and Best Practices
Once your rollup is deployed and tested, the work doesn’t stop there. Keeping everything running smoothly requires ongoing monitoring and maintenance. This ensures your rollup performs at its best and stays secure. Start with monitorism, a tool that audits output roots, withdrawal events, and system invariants to keep tabs on security. If your chain uses fault proofs, set up op-dispute-mon to monitor dispute games over a rolling 28-day window. This setup helps detect and address any invalid state transitions promptly, preserving the integrity of your rollup. Continuous monitoring post-deployment is key to maintaining system reliability.
Monitoring and Observability
A solid monitoring stack is essential to track and analyse your system’s performance. Enable metrics on all components by passing the --metrics.enabled flag to op-node, op-geth, op-batcher, and op-proposer. Use Prometheus to scrape performance data from these components, store it in InfluxDB, and visualise insights through Grafana dashboards. Key metrics to watch include:
- Node sync status (
op_node_default_refs_number) - Peer count (
op_node_default_peer_count) - RPC latency (
op_node_default_rpc_client_request_duration_seconds)
Monitoring RPC client request durations can help identify bottlenecks early. For Canadian enterprises, you can customise Grafana to show timestamps in EST or PST and even integrate CAD conversion rates to track gas costs effectively. With this real-time visibility, you’ll be well-prepared to maintain system health.
Operational Best Practices
To ensure production uptime, follow strict shutdown and startup procedures. When shutting down, always stop components in this order: Batcher first (using admin_stopBatcher via RPC to save cached data), followed by Proposer, then Node, and finally Geth using CTRL-C for a clean shutdown. This prevents database corruption, which could lead to lengthy resyncs. When restarting, reverse the sequence.
Keep a close eye on the balances of your batcher and proposer accounts – they need sufficient funds to cover L1 gas fees for batch submissions and state root postings. Also, monitor the sequencer’s transaction backlog; a growing backlog signals performance issues that need immediate attention. For network upgrades tied to specific timestamps, ensure your node software is updated ahead of deadlines to avoid chain divergence.
Conclusion and Next Steps
Optimistic Rollup deployment offers a powerful way to improve the scalability and cost efficiency of dApps. By leveraging Layer 2 solutions, gas costs can plummet to as little as 0.001 Gwei – an astonishing contrast to the roughly 40 Gwei typically seen on Layer 1. At the same time, rollups maintain Ethereum Mainnet’s robust security, ensuring that off-chain computations are both accurate and trustworthy.
Now that the advantages of rollups are clear, the focus shifts to the steps required for a successful deployment. This process involves several critical stages: carefully designing your rollup architecture, configuring development environments, deploying the necessary Layer 1 smart contracts, and setting up ongoing monitoring systems. Precision in every phase – planning, deployment, and even shutdown – is key to achieving maximum cost savings and performance. Additionally, effective data compression plays a pivotal role in lowering transaction costs and boosting overall efficiency.
For Canadian businesses, these technical challenges demand a high level of expertise. Managing complex, multi-component architectures while ensuring security through dedicated challenger nodes is no small feat. This is where Digital Fractal Technologies Inc steps in. With a strong track record in custom software development and digital transformation, they offer tailored solutions for Canadian enterprises. Their expertise spans workflow automation, API integrations, and scalable application development, making them an excellent partner for handling the complexities of Optimistic Rollup deployments in industries like the public sector, energy, and construction.
FAQs
What are the key advantages of using Optimistic Rollups for scaling Ethereum?
Optimistic Rollups improve Ethereum’s scalability by handling transactions off-chain while ensuring security through on-chain fraud-proof verification. This method boosts transaction capacity by 10 to 100 times, offers lower gas fees, and enables quicker transaction confirmations.
By easing congestion on Ethereum’s mainnet, Optimistic Rollups make it cheaper and more efficient for developers to create and expand decentralised applications, all while benefiting from Ethereum’s strong security and decentralised framework.
How do Optimistic Rollups maintain transaction security and accuracy?
Optimistic Rollups enhance transaction security by bundling several transactions into batches and submitting the outcomes to Ethereum’s main chain. Their approach assumes all transactions are valid unless someone proves otherwise.
To ensure accuracy, they include a fraud-proof challenge period. During this time, anyone can dispute a transaction they believe is invalid. If a valid fraud proof is presented, the system reverses the invalid transaction, ensuring only correct data is finalized. This process strikes a balance between scalability and reliability, making Optimistic Rollups a trusted choice for decentralized applications.
What tools and skills do I need to deploy Optimistic Rollups?
Deploying Optimistic Rollups involves a range of tools and technical know-how. Some of the essential components include the OP Deployer, which publishes Layer 1 (L1) contracts, and op-geth, a Geth client compatible with Optimism that runs the sequencer. You’ll also need the op-batcher to aggregate Layer 2 (L2) transactions and the op-proposer to submit transaction batches to L1. Additionally, you’ll configure chain-specific settings like block time, gas limits, and the Genesis state for your testnet. These tools are designed to work on Linux and macOS systems and can be managed using command-line interfaces.
On the skills side, expertise in Ethereum smart contract development (such as Solidity) is crucial. You’ll also need strong system administration skills for tasks like server setup, networking, and managing TLS certificates. Knowledge of cryptographic key management is a must, along with experience in Go, the programming language behind Optimism binaries. Familiarity with testing L2-specific logic is another valuable asset. At Digital Fractal Technologies Inc., we blend these technical capabilities with AI-driven automation to ensure smooth Optimistic Rollup deployments that align with Canadian performance and regulatory requirements.